How to Take a Screenshot on a Laptop: A Comprehensive Guide
In today’s digital age, knowing how to take a screenshot on your laptop is a valuable skill. Screenshots serve various purposes, from sharing information and solving errors to preserving visual content. This article will guide you through the methods of taking screenshots on both Windows and Mac operating systems, catering to the diverse needs of laptop users.
Windows Users: Capturing Your Screen
1. Print Screen Key Method
Taking a screenshot on Windows is as easy as pressing the Print Screen key. Alternatively, use CTRL + Print Screen to capture the entire screen.
2. Win Key + Print Screen Shortcut
Combine the Win key with Print Screen to capture your display effortlessly.
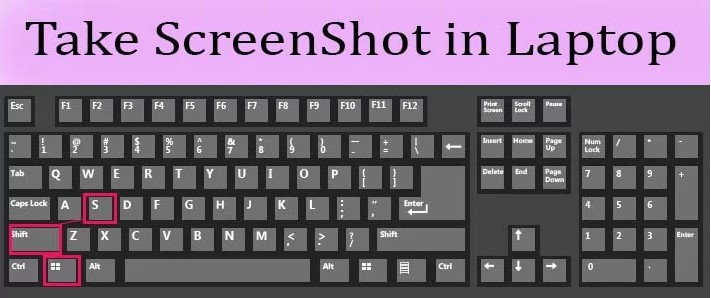
3. Windows + Shift + S Shortcut
Another convenient method is using the keyboard shortcut Windows + Shift + S to grab a screenshot.
4. Game Bar Screenshot
Explore the game bar functionality to capture specific pages with ease.
MacBook Users: Mastering Screenshot Techniques
1. Full Screen Capture
For MacBook users, press Shift + Command + 3 simultaneously to capture the entire screen. A confirmation will appear in the top right corner.
2. Editing and Saving Full Screen Capture
After capturing, edit the screenshot by clicking on the preview. Wait for it to be saved if needed.
3. Partial Screen Capture
Hold down Shift, Command, and 4 keys to activate the crosshair. Drag to select a portion, press Space Bar to move the selection, and use Esc to cancel.
4. Editing and Saving Partial Screen Capture
Tap the thumbnail or wait until the screenshot is saved to your desktop for further editing.
Conclusion
Taking screenshots on a laptop is a straightforward process, providing a range of options for users on both Windows and Mac systems. Whether you need to troubleshoot, share graphics, or document information, mastering these methods enhances your overall laptop experience.
Frequently Asked Questions (FAQs)
Q1: Can I take a screenshot of a specific window on Windows?
Yes, you can use the Snipping Tool or Snip & Sketch to capture specific windows on Windows.
Q2: Are there third-party apps for advanced screenshot features?
Certainly! Apps like Snagit and Lightshot offer advanced features for capturing and editing screenshots.
Q3: How do I find my screenshots on a MacBook?
Mac saves screenshots on the desktop by default. Look for the files labeled as “Screen Shot” followed by the date and time.
Q4: Can I customize the shortcut keys for taking screenshots?
On Windows, you can customize the keyboard shortcuts using third-party tools. Mac users can customize shortcuts in the Keyboard preferences.
Q5: What’s the quickest way to take a screenshot without using keyboard shortcuts?
On Windows, you can use the Snip & Sketch tool, while Mac users can utilize the Grab application for a quick screenshot.